 OmniPressix
PDF output and printing
PDF output and printing#
“Create PDF” produces the file karten.pdf. At the top of the Print window you choose the paper: Single cards (default, for card printers), A4 sheet (see A4 sheet with crop marks), for label formats Label sheet (see Label sheet) or Label roll for label printers such as Zebra (see Label roll). For single cards:
- Each page has exactly the size of the chosen format (default 85.6 × 54 mm).
- For each card the front comes first, then the back (if both ticks are set).
- With the ticks “Print front” and “Print back” at the top right you choose which sides are output. With “Create PDF” both sides end up in one file, whereas “Print directly” prints them one after the other (see Print directly). Both ticks are set by default. So you can e.g. print only the fronts with the customer data if the backs are already pre-printed. At least one tick must stay set.
- Without a loaded CSV a single sample card is produced.
- With loaded card data the Print window says how many cards are printed. You can print only individual cards or only those without notices, see Choosing cards to print.
- For large stacks (more than about 20 card sides) creation runs in the background: a progress bar with a percentage appears below the buttons, plus a button “Cancel”. For small stacks it stays with the previous, immediate creation without a progress display.
Result, preview and further settings#
Below the paper the Print window shows in one sentence what comes out, e.g. “Result: 8 cards, front and back → 2 sheets (8 per sheet)” or “… → 16 pages in the PDF (one card per page)”; it adapts to paper, sides, bleed and the chosen cards.
Preview … creates the first cards as a real PDF (for sheets one sheet, otherwise four cards) and shows it in a window, without printing and without an entry in the print log. If the preview stays empty (some program windows have no PDF viewer), “PDF in new window” opens it in the browser.
Rarely used settings – cut contour for cutting plotters and print offset with the test page – are collapsed under “More settings”. Behind it, in brackets, is what is switched on in it, e.g. “(cut contour, print offset)”. The buttons “Preview …”, “Print directly” and “Create PDF” stay visible at the bottom edge even with a long window.
Print directly#
The “Print directly” button opens the browser’s print dialog without your having to save and open the PDF first. Which sides are printed is determined by the ticks “Print front” and “Print back”:
| Ticks | Procedure |
|---|---|
| front only | The front(s) are printed. |
| back only | The back(s) are printed. |
| both, “Printer prints on both sides (duplex)” on | Fronts and backs go out in one print job, without a pause. Choose “Two-sided” in the print dialog (for the A4 sheet “long edge”). |
| both, duplex off | The fronts are printed first. Then a message appears telling you to turn the card (or the A4 sheets) over and put them back in the printer. Only when you confirm are the backs printed. With “Cancel” it stays with the fronts. |
The option “Printer prints on both sides (duplex)” appears in the Print window as soon as both ticks are set. It is remembered per paper type: for the A4 sheet it is on by default (most office printers can print duplex), for single cards off – switch it on there if your card printer has a duplex module.
Further notes:
- With a CSV of several cards, all fronts are printed first, then all backs. Insert the stack turned over as a whole and watch in what order your printer outputs the cards.
- In the print dialog choose 100 % or “actual size” and no scaling to page size. Card printers usually take the page format directly.
- A browser may not print without asking, so the print dialog appears at every print. If you want to skip it, you can start Chrome or Edge with the start option
--kiosk-printing. The browser then prints without a dialog to the default printer. The message to turn the card over still appears unless the duplex option is on. - If the browser blocks printing, the PDF is downloaded instead and you can print it by hand.
A4 sheet with crop marks#
For everyone without a card printer: choose “A4 sheet” in the Print window. Then there are 10 cards per A4 sheet (2 columns × 5 rows), printed on normal paper or thin card and then cut out. With bleed the cards need more room: up to 1 mm it stays at 10, from 1.5 mm 8 cards (2 × 4) fit on the sheet. The notice in the Print window shows the current number.
- The cards lie directly next to each other, so every cut goes across the whole sheet.
- Copies per card / Fill sheet: If all cards are the same (or there is only one), set under “Copies per card” how often each card goes on the sheet, or choose “Fill sheet”: each card is then repeated until a whole sheet is full. With several data rows they follow one another, grouped by card. This applies to the A4 sheet and the label sheet (not the roll) and is saved with the print profile. Short crop marks at the edge of the sheet show where: put a ruler from a mark to the opposite mark and cut through.
- With bleed (tick on the left under “Card side”) every card gets background all around in the set width, and the cards move apart by twice the width (so by 2 mm at 1 mm). A thin grey line per card then shows the exact edge, and the crop marks sit on this edge. This is worthwhile for background images that go to the edge.
- Front and back: Each sheet of fronts is followed by a sheet with the matching backs. The backs are arranged mirrored horizontally so that with double-sided printing over the long edge they lie exactly behind their front. With “Print directly” without a duplex printer: after the fronts turn the sheets over the long edge (top stays top) and insert them again.
- In the print dialog be sure to choose “Actual size” or 100 %, otherwise the card dimensions are wrong. Print a test sheet first and measure with a ruler (85.6 × 54 mm).
- The crop marks keep a 3 mm distance from the edge of the sheet because many printers cannot print the outermost margin.
Label sheet#
For a label format (see Card format) the Print window also offers “Label sheet”, and it is selected right after the format change. The labels are then placed exactly where the manufacturer specifies for the sheet (Avery Zweckform L7160, L7163, L7165 or 3475 or sheets of other brands of identical construction), without crop marks and without bleed – the labels are already die-cut. Labels are single-sided, so the tick “Print back” is locked. In the print dialog choose “Actual size” or 100 % and first print a test page on normal paper and hold it against a label sheet.
Custom label sheet: For other sheets there is the format “Custom label sheet”. Below it you enter the dimensions from the packaging or the data sheet: size of one label, columns and rows, the margin on the left and top up to the first label and the gap between the labels horizontally and vertically. The paper is A4, Letter, Legal, A5 or A3. A small drawing of the sheet shows the arrangement; if the sheet does not fit on the paper, it turns red and the program rejects the PDF. The dimensions belong to the layout and are saved in files and templates. With “Save grid …” you remember a sheet under a name (only in this browser, up to 20); the list “Saved grids” takes it over again later, “Delete” removes it.
Rolls from Brother and Dymo: Under “Format” there are also common rolls (Brother DK series, Dymo LabelWriter). The choice sets the label size and the paper to “Label roll”. In the printer driver you must set the same paper size; if needed, “Rotate label” helps.
Sheets by manufacturer: Under “Format” there are common types from Avery Zweckform (3422, 3424–3427, 3481, 3483, 3484) and Herma (4200, 4226, 4360, 4452). The choice fills the custom label sheet with the size and number of the type. Margin and gap are not from manufacturer data; the labels lie gap-free and centred on the sheet. Check the dimensions against the sheet with a test print on plain paper and change margin and gap under the format if needed.
Label roll#
For label printers that print from a roll – Zebra (e.g. ZD421, GK420, ZT230), Brother QL/TD, Dymo and similar: choose “Label roll” in the Print window. This works with any format; for roll labels the “Custom format” with the label size from the roll usually fits (width across the direction of travel, height in the direction of travel).
- Each PDF page is one row of the roll: as wide as the roll, as high as one label. The printer itself advances to the next label after every page; the gap between two labels in the direction of travel is therefore not in the PDF.
- Labels side by side: For multi-lane rolls (2, 3 or more labels side by side) enter the number and the gap between the labels, plus the margin on the left and right if the backing paper is wider than the labels. The cards from the card data are distributed one after the other from left to right.
- Rotate label: Many label printers have a 4-inch print head (104 mm). If the label is wider than the printer can print (or lies across the roll), rotate the label by 90°. If the roll becomes wider than 104 mm, the Print window warns.
- No crop marks, no bleed, no cut contour, fronts only – the labels are already die-cut.
- The print offset has its own set of values for the label roll. The roll’s settings can be saved in a print profile, e.g. “Zebra warehouse”.
Setting up the printer driver (once): Under Windows, Zebra printers need the driver “ZDesigner” from Zebra, under Linux and macOS the Zebra driver of CUPS. In the driver’s print settings:
- Paper or label size exactly as large as a PDF page – the Print window shows the size in the notice below the roll settings.
- Media type: “Labels with gap” (the usual die-cut labels), “Mark” (black line on the back) or “Continuous”.
- Print method: “Direct thermal” for thermal paper without ribbon, “Thermal transfer” with ribbon.
- After inserting a new roll have the printer calibrate (with Zebra usually hold the “Pause” + “Feed” keys or via the driver menu) so that it detects the gaps.
In the print dialog choose “Actual size” or 100 %. Label printers print black only: colours become screens, photos dotted greyscale. For well-readable barcodes design black on white and not too small (bar width from about 0.25 mm at 203 dpi).
Print-shop PDF#
For print shops there is, in the Print window under “Paper”, the tick Print-shop PDF (3 mm bleed, crop marks, colour strips). It applies to Single cards and the A4 sheet, not to label sheets and rolls (nothing is cut there). On the A4 sheet every card gets 3 mm of bleed (correspondingly fewer cards fit on the sheet); the crop marks stay at the edge of the sheet as before, the colour strips (2.5 mm patches) right at the top and bottom of the sheet margin; there are no TrimBox and BleedBox there because several cards are on the page. For single cards:
- Each page is card + 3 mm bleed (the width can be changed like the bleed) + 5 mm margin; in the margin there are crop marks at the four corners of the finished card and two colour control strips made of 3 × 3 mm patches: at the top the solid colours cyan, magenta, yellow, black, red, green, blue and rich black, at the bottom black in steps from 10 to 90 % and cyan, magenta and yellow at 50 %. The print shop uses them to check density and colour cast. The patches are specified in CMYK; with very narrow cards the last patches are left out.
- The PDF has TrimBox (finished card) and BleedBox (with bleed) set, which most print-shop programs read.
- The grey guide line at the cut edge is omitted (it would be printed), as is rotation.
- Fonts: The built-in fonts (Helvetica, Times, Courier) are not embedded in the PDF, which some print shops complain about. The editor points this out; with a font of your own from the “Fonts” area it is embedded.
- It is not PDF/X: colours stay RGB, there is no colour profile. For most card prints this is enough; if the print shop requires PDF/X-1a, it or a PDF program converts it.
Bleed for cutting yourself#
The tick “Print with bleed” is on the left in the “Card side” area below the background image, below it the width per side (0.5–5 mm, default 1 mm; usual are 1–3 mm, some print shops require 2 or 3 mm). It is only intended if you print on normal paper or card and cut the card yourself afterwards, e.g. with a guillotine or a cutter and ruler.
What changes:
- The PDF page becomes larger on every side by the set width (at 1 mm 87.6 × 56 mm, at 3 mm 91.6 × 60 mm instead of 85.6 × 54 mm).
- The background image fills the whole, larger page, so it extends by this width beyond the later edge of the card. That way no white edge appears when cutting if the cut is not one hundred percent accurate.
- Text and barcode stay unchanged at their set position on the actual card, they do not move outward with it.
- A thin grey line shows exactly the edge of the finished card. You cut along this line.
- In the work area a dashed frame around the card shows how far the bleed reaches. This is only a preview and changes nothing about the placement of your fields.
Without a background image bleed brings nothing, so you just leave the tick off. With a card printer (feeding finished plastic cards) the tick must not be set: the card itself is exactly 85.6 × 54 mm, a printer cannot print beyond its edge, and a larger PDF then does not match the printer’s card format.
The tick applies to “Create PDF” and to “Print directly” alike.
Compensating print offset and test page#
Many printers do not print quite exactly where they should, and with double-sided printing the back often lands a bit beside the front. “Compensate print offset” in the Print window evens this out without your having to move fields: front and back can be shifted separately by up to 10 mm to the right and down (negative values: to the left and up, always as you look at the page). There are three sets of values: one for single cards (card printer), one for A4 and label sheets and one for label rolls. If values are entered, the summary is already in the collapsed row.
This is how you find the values:
- “Print test page” (or “Test page as PDF”). Each card of the test page has a frame that should be exactly 3 mm from the edge everywhere, on the front a cross in the middle, on the back a millimetre scale.
- On each side measure the distance from the frame to the edge with a ruler and add it to the entered value: to the right = (right − left) ÷ 2, down = (bottom − top) ÷ 2. Example: left 4 mm, right 2 mm → to the right −1 mm.
- With the A4 sheet there are no fixed edges; there hold the sheet against the light and read off on the back where the cross of the front lies on the scale (right and down are plus). Add these values for the back.
- Print the test page again and check.
Print profiles#
At the top of the Print window is “Print profile”. “Save as profile …” remembers all settings of the window under a name, e.g. “Card printer reception” or “A4 office”: paper, front/back, duplex, rotation in portrait, cut contour, print offset and bleed. Later it is enough to choose the profile. If a setting deviates from the profile, “(changed)” appears next to it, and “Update profile” takes over the change; “Delete” removes the profile. Profiles can also be applied through the command search.
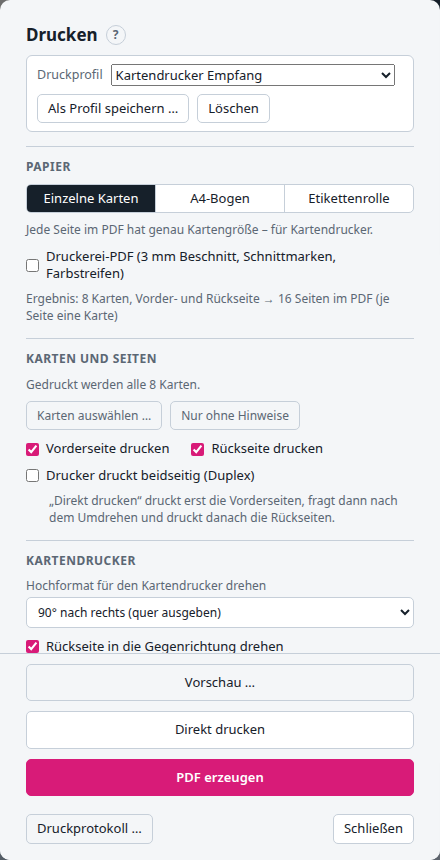
The browser stores the profiles, so they apply to this computer and browser – which suits the print offset, which depends on the respective printer. Unlike the interim state they are also kept on signing out in server mode.
Rotating portrait format for the card printer#
Many card printers only feed cards in landscape. If the layout is in portrait and “Single cards” is chosen in the Print window, there is therefore the choice “Rotate portrait for the card printer”:
- 90° to the right (default) or 90° to the left: every PDF page is landscape (85.6 × 54 mm), the card is rotated on it. Set landscape in the printer driver. For chip cards choose the direction so that the chip lies where the printer expects it – with “chip at the bottom” this is the left side with “to the right”, as with a normal credit card.
- Do not rotate: the PDF stays upright, for drivers that rotate portrait themselves.
“Rotate the back in the opposite direction” (default: on) rotates the back the other way round than the front. This fits if the back would otherwise be upside down; otherwise remove the tick. The easiest way is to try it with the test card – its lettering shows where the top is.
The print offset applies after rotating, so as the card comes out of the printer in landscape. On A4 and label sheets nothing is rotated, there portrait cards simply lie upright next to each other.
Cut contour for cutting plotters#
Anyone who prints cards or stickers on paper, card or foil and cuts them out with a cutting plotter (e.g. Silhouette, Cricut, Roland, Summa) sets the tick “Cut contour for cutting plotter” in the Print window. “Create PDF” then draws on every front a line exactly on the card edge:
- in the spot colour “CutContour” (substitute colour magenta) – this is how the common plotter and RIP programs recognise the cut line,
- on its own PDF layer “CutContour”, which can be hidden in the PDF program,
- with rounded corners: the corner radius is preset by the format (credit card 3.18 mm, otherwise square) and can be changed. The preview in the editor then shows the corners as they are cut.
The contour is available for single cards and on the A4 sheet, not for labels (they are already die-cut) and not with “Print directly” – there it would be printed as a magenta line. Together with the bleed the edge is clean after cutting. The line is drawn opaque (not overprinting); at 0.1 mm width at the card edge this does not matter after cutting.
The browser remembers the values, “Set to 0” switches the compensation off again.
Print log#
OmniPressix records who printed which cards when or created them as a PDF – e.g. for the audit of staff IDs. Every job with card data is entered, with “Print directly” as with “Create PDF”; test page and sample card are not. Who printed is filled in by the program itself: in server mode with LDAP the login name (and the display name from the directory), otherwise the user of the operating system under which the program runs. The editor cannot specify it.
For each job the log contains: time, user, printed directly or PDF, front and/or back, paper, the template loaded or saved last and each card with the value of the unique column (“Card data” area, e.g. the staff number), first and last name (otherwise the first two columns) and the running number {{Nr}}. Without a unique column it is logged anyway, but the cards cannot then be recognised again.
Already printed? Before every print the editor asks the log. If a card with the same value of the unique column was already printed or created as a PDF – by anyone –, the check list names it: “Card 2 (PL-2) already printed on 29.09.2026, 14:03 by anna”. With “Print anyway” you carry on.
“Print log” window: at the bottom of the Print window “Print log …” or through the command search. The newest jobs first; the search finds names, numbers, users and templates, also in older entries. A click on a job shows its cards. As CSV (Excel) downloads the (filtered) log, one row per card.
Print again: In the expanded job tick the cards (e.g. only the lost ID) and choose “Print again …”. The Print window then shows “Print again: 1 card from the print log”, and printing works as usual with Print directly or PDF, with the current settings. The cards are looked up through the unique column in the loaded card data and printed with the current layout, {{Nr}} keeps the card’s number. If cards are missing in the card data, the editor says which. In the log the job is entered as “printed (again)”. “All cards” or closing the Print window cancels the selection.
Where it is: in the file druckprotokoll.jsonl (start option -druckprotokoll, environment variable OMNIPRESSIX_PRINT_LOG; in the Docker image /data/druckprotokoll.jsonl, in the KDE client in ~/.local/share/omnipressix). Each line is one job; the program only appends and never changes earlier entries. The log can only be deleted or shortened through the file itself. If the file becomes larger than -druckprotokoll-mb (default 20 MB, 0 = never), the program sets it aside as druckprotokoll.<date>-<time>.jsonl and starts a new one; the files set aside stay unchanged and are read along in display, search, CSV export and the warning about double printing. Tidying up old files is up to the operator. If the program cannot write the file, it does not print – so the log stays complete. With -druckprotokoll aus it is switched off.
In server mode all signed-in users see the whole log, otherwise nobody could warn about double printing by colleagues. The log contains names and numbers of people: retention period and access to the file belong in the data-protection concept.
Digital ID (wallet pass, preview)#
In addition to the printed card, the card currently shown can be exported as a digital ID for the phone: at the bottom of the Print window “Digital ID …” opens a window of its own with “Wallet pass (Apple) …” (downloads a .pkpass file named after the first and last name of the card – to open in Apple Wallet or as an e-mail attachment) and “To Google Wallet …” (shows the save link in a further window with “Copy link”, “Send by e-mail …” and “Open”). The “Digital ID …” button only appears if the program was started with -wallet – the feature is still a preview and off by default.
What is taken over are the visible text fields of the front (the first ones as primary and secondary data, further ones on the back of the pass), the first QR code or vCard code as the pass barcode (Apple Wallet does not know barcodes such as Code 128) and the first dynamic image field as a small preview image. Layout colours, shapes and fixed images do not appear in the pass – Apple and Google prescribe a fixed appearance of their own for that.
Setting up: Without credentials of your own, “Wallet pass (Apple)” still delivers a file, but unsigned (notice when creating) – for looking at the content, not for real devices. For a real, installable pass you need an Apple developer account with a Pass Type ID certificate and the Apple WWDR intermediate certificate (start options -wallet-apple-cert, -wallet-apple-key, -wallet-apple-wwdr, plus -wallet-apple-team and -wallet-apple-type). For “To Google Wallet” a Google Cloud service account of the Google Wallet API is needed (-wallet-google-sa with the path to the JSON file, plus -wallet-google-issuer and -wallet-google-class); without it the Google button stays hidden. All options: Command-line options.