 OmniPressix
Photos and image fields
Image fields (e.g. passport photos)#
With “+ Image” you add an image field, for example for a passport photo or a logo. In the Properties panel you choose one of two kinds:
- Fixed image: the same image on every card, e.g. a company logo. With “Choose image” you load a JPEG or PNG file directly into the field. SVG files (logos as vector graphics) can be loaded too, also as a background image: for the preview and as a fallback a PNG of up to 2400 pixels on the longer side is created. For a fixed image in an image field the vector graphic also stays in the layout (up to 400 KB), and the PDF draws it as a vector – sharp at any size, also in the print-shop PDF. Supported are paths, rectangles, circles, ellipses, lines, polygons, groups and transformations with a solid fill and stroke including opacity. If the graphic contains anything else (text, gradients, filters, masks, clipping, CSS classes, dashed lines, embedded images), the PDF uses the PNG instead; so convert text in the graphic to paths first. As a background image and as a logo in the QR code the PNG always applies. Without
width/heightorviewBoxthe file has no size and is rejected. - From photos (per card): a separate photo for each card, e.g. each person’s passport photo. For this you choose a column of the card data in the field (e.g. “Kundennummer”) and upload the images on the left in the “Photos” area. Every image file must be named like the value of this column in the respective row, e.g.
1000123456.jpgfor the customer number1000123456. Upper/lower case and the file extension do not matter. If a card has no matching photo, the field stays empty for that card. The data check points this out, but you can print anyway.
Further settings in the image field:
- Fill fills the whole field and cuts off protruding parts of the image (like a classic passport photo); which part is visible is determined by the crop. Fit always shows the whole image, but leaves a margin if the aspect ratio differs.
- Corner radius (mm) rounds the corners of the image, 0 = square.
- Show frame draws a coloured border around the image field, with adjustable width and colour – like a small passport-photo frame. The frame is always square around the whole field, even if the image itself is rounded by the corner radius or, with “Fit”, does not reach the edge.
Only JPEG and PNG are supported (SVG only as a fixed image or background, see above).
Storing photos: The program puts uploaded photos in the fotos folder (adjustable with -fotos-dir), in server mode with sign-in separated per user. They are therefore still there after reloading and after a restart, until you remove them in the “Photos” area with × or “Delete all photos”. A photo with the same name replaces the previous one. The easiest way to upload many photos at once is as a ZIP file: all JPEG and PNG files in it (also in subfolders) are taken, other files are skipped. Phone photos that are supposed to be displayed rotated according to EXIF are rotated upright on upload – so they look in the PDF exactly as in the preview.
Taking photos with the camera#
At reception or in the personnel department it works without a detour through files: in the “Photos” area “Take with camera …” (also via the command search) opens a window with the image of the webcam.
- Choose the person for the card. The card shown is preselected, otherwise the next one without a photo; cards with a photo are marked with ✓.
- The file name comes from the column used by the first image field “From photos” (e.g. the customer number); without such an image field from the unique column. It can be changed, and without card data also entered freely. If a photo of this name already exists, Save replaces it.
- Face into the dashed oval, Capture (Space), then Save (Enter) or Again. What is captured is the bright frame, which has the aspect ratio of the image field. The preview is mirrored like a mirror, the photo is not.
With “Align crop to the face” the new photo is cropped right away like with “Align to face”. “Then to the next card without a photo” chooses the next person after saving, so many photos can be taken in a row. The editor shows the card with the new photo each time.
If the computer has several cameras, a choice appears; the browser remembers the one chosen.
The camera only works in a secure context: locally (http://127.0.0.1, localhost) or in server mode over https. Over plain http:// to another computer the browser does not allow the camera; the editor then says so. The first time, the browser asks whether the page may use the camera. In the KDE client the camera is released for the editor, otherwise for no site.
Checking photos: resolution and face#
The program measures each photo once (pixels, faces) and remembers this in qualitaet.json in the photo folder; new photos are measured in the background. For each card the data check reports – in the status display, overview and check list before printing – if in the image field
| Notice | Meaning |
|---|---|
| resolution too low: 180 instead of 300 dpi | The photo has too few pixels for the size and crop of the field, so the print will be blurry. Card printers print at 300 dpi; for a passport photo of 26 × 32 mm you need at least 307 × 378 pixels, correspondingly more with zoom. |
| no face detected | No face can be found in the photo (wrong photo, back of the head, too dark). |
| 2 faces | Several people in the foreground. Faces in the background that are at most half as large do not count. |
| face outside the crop | The chosen crop does not show the face. |
| face too small | The face takes up less than a quarter of the field height – such as a full-body photo. Zoom in with “Align to face”. |
In the photo list in the “Photos” area ⚠ is shown on photos with no face or with several faces. The face search can be wrong, e.g. with glasses with reflections or a strongly sideways gaze – the notice is then only a notice, you can print anyway.
Image crop and face detection#
With “Fill” there is the button “Choose crop …” in the Properties panel. In the window a bright frame in the shape of the image field lies over the image:
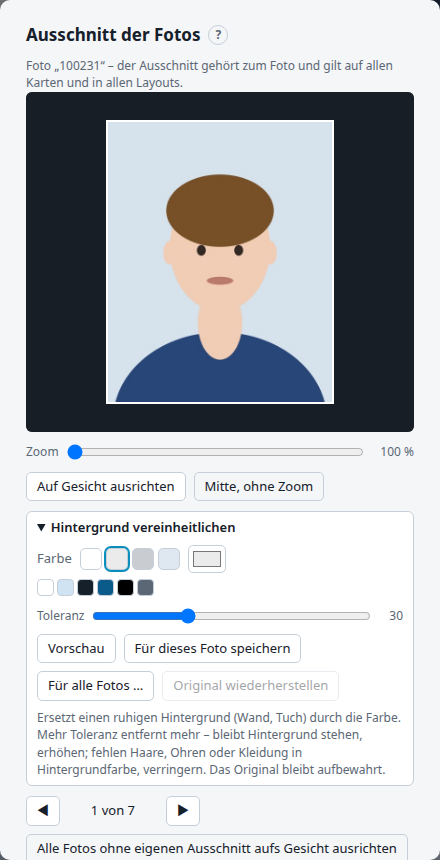
- Move the image with the mouse, zoom with the mouse wheel or the slider (up to 800 %). The image can never be moved so far that an empty margin appears in the field.
- Align to face looks for the face and puts it horizontally centred, slightly above the middle, and zooms so that head and chin fit in the field like in a passport photo.
- Centre, no zoom resets the crop.
- With “From photos” you browse with ◀ ▶ through all photos the field shows on the cards. “Align all photos without their own crop to the face” does this for all at once and names the photos in which no face was found. It is only saved with “Apply”.
With a fixed image the crop belongs to the image field (and thus to the layout). With photos it belongs to the photo itself: it is stored in the photo folder (ausschnitte.json) and applies in every layout and every image field that shows this photo. A newly uploaded photo of the same name starts centred again. In the photo list ✂ marks photos with their own crop.
Unify background: For photos from the photo folder there is, in the same window, the “Unify background” area. It replaces a calm background (wall, cloth, photo backdrop) with a uniform colour – white, light grey, grey, light blue or one of your own.
- Preview shows the result in the window, Save for this photo applies it, For all photos … processes all photos of the image field with the same settings.
- Tolerance (default 30): if background remains, increase it; if hair, ears or clothing disappear in the background colour, decrease it.
- The original is kept (subfolder
originalin the photo folder). Every new setting is calculated from the original, Restore original brings it back. In the photo list ◐ marks processed photos. The crop is kept.
The method manages without an AI model: it estimates the background colour at the image edges and lets an area grow into the image from there until it hits edges (hairline, shoulder); face and neck are protected, and the transition is faded out softly. With a busy background (windows, shelves, patterns) or clothing in the same colour as the background (white shirt against a white wall) it does not work cleanly – then rather take a new photo against a calm background.
The face search runs in the program itself (without internet, with pigo). It finds faces that look roughly straight into the camera; with rotated, strongly tilted or very dark photos it often fails – then choose the crop by hand.